- 本文以 3b+ 为基础硬件设施,暂时只保证 3b+ 的可用性。为什么?我只有 3b+ ㄟ( ▔, ▔ )ㄏ
- 推荐使用
CTRL+F快速定位问题 - 请关注最后修改时间,本文内容可能年久失修
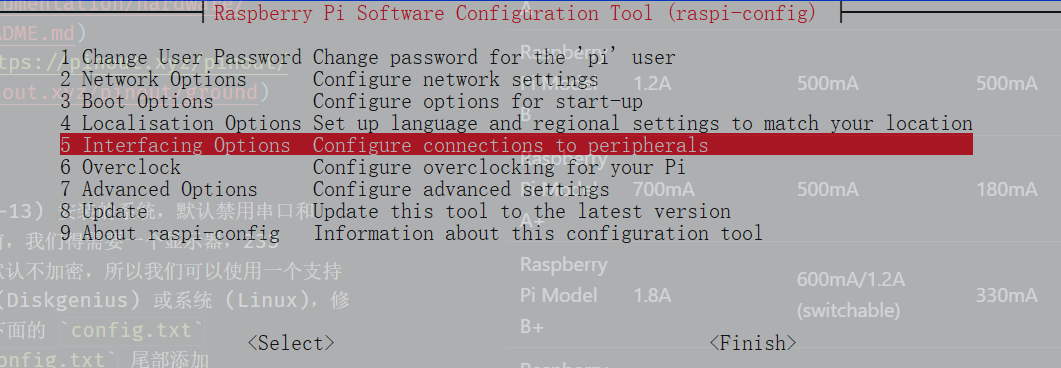
- 更多简单操作自行发掘 raspi-config
官方文档
- 所有文档: https://www.raspberrypi.org/documentation/
- 串口文档:https://www.raspberrypi.org/documentation/configuration/uart.md
/boot/config.txt配置文件说明: https://www.raspberrypi.org/documentation/configuration/config-txt/README.mdraspi-config工具说明: https://www.raspberrypi.org/documentation/configuration/raspi-config.md

- 电源说明(供电电流,USB最大输出电流): https://www.raspberrypi.org/documentation/hardware/raspberrypi/power/README.md
| Product | Recommended PSU current capacity | Maximum total USB peripheral current draw | Typical bare-board active current consumption |
|---|---|---|---|
| Raspberry Pi Model A | 700mA | 500mA | 200mA |
| Raspberry Pi Model B | 1.2A | 500mA | 500mA |
| Raspberry Pi Model A+ | 700mA | 500mA | 180mA |
| Raspberry Pi Model B+ | 1.8A | 600mA/1.2A (switchable) | 330mA |
| Raspberry Pi 2 Model B | 1.8A | 600mA/1.2A (switchable) | 350mA |
| Raspberry Pi 3 Model B | 2.5A | 1.2A | 400mA |
| Raspberry Pi 3 Model A+ | 2.5A | Limited by PSU, board, and connector ratings only. | 350mA |
| Raspberry Pi 3 Model B+ | 2.5A | 1.2A | 500mA |
| Raspberry Pi 4 Model B | 3.0A | 1.2A | 600mA |
| Raspberry Pi Zero | 1.2A | Limited by PSU, board, and connector ratings only | 100mA |
| Raspberry Pi Zero W/WH | 1.2A | Limited by PSU, board, and connector ratings only. | 150mA |
- USB 说明(已知问题,排查问题方法): https://www.raspberrypi.org/documentation/hardware/raspberrypi/usb/README.md
- GPIO引脚说明: https://pinout.xyz/pinout/ground
启用串口
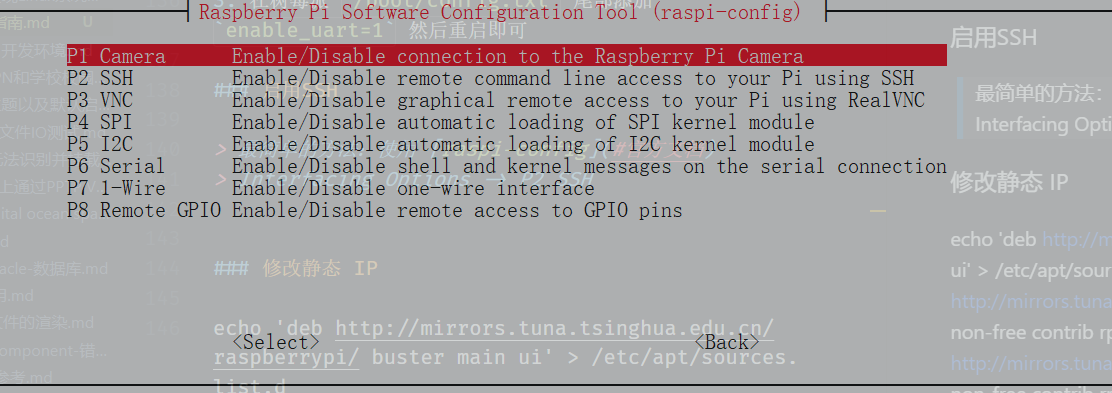
最简单的方法:使用 raspi-config
Interfacing Options -> P6 Serial
- 因为现在 (2020-05-13) 安装的系统,默认禁用串口和ssh,所以在做这件事之前,我们得需要一个显示器,233
- 但是由于树莓派分区默认不加密,所以我们可以使用一个支持
ext4文件系统的软件(Diskgenius) 或系统 (Linux),修改树莓派boot分区下面的config.txt - 在树莓派
/boot/config.txt尾部添加enable_uart=1然后重启即可
启用SSH
最简单的方法:使用 raspi-config
Interfacing Options -> P2 SSH
- 在 /boot/ 文件夹下面创建 ssh 或者 ssh.txt 文件即可,文件可以为空,重启后 ssh 就会默认启用
ssh or ssh.txt
When this file is present, SSH will be enabled on boot. The contents don’t matter, it can be empty. SSH is otherwise disabled by default.
修改静态 IP
可使用
ip addr查看接口信息
- 修改
/etc/dhcpcd.conf,在文件尾部添加
1 | # Example static IP configuration: |
- 重启树莓派即可
直接修改
/etc/network/interface也可
从外置 USB 大容量硬盘或者U盘启动树莓派
See: https://www.raspberrypi.org/documentation/hardware/raspberrypi/bootmodes/msd.md
- 目前只有 3b+ 和 CM3+ 支持开箱即用的USB大容量存储启动
- 所有操作和从 SD 卡启动一样(刷入系统,启动)
修改源
示例基于 rasbian 10 和 清华源
因为默认我安装的这个版本,默认不安装 vim, 故使用 echo
See: https://mirrors.tuna.tsinghua.edu.cn/help/raspbian/
1 | sudo echo 'deb http://mirrors.tuna.tsinghua.edu.cn/raspberrypi/ buster main ui' > /etc/apt/sources.list.d |
apt update 出错
E: http://mirrors.tuna.tsinghua.edu.cn/raspberrypi/dists/buster/InRelease 的 Release 文件已经过期(已经过期了 95天 14小时 42分 13秒) 。该仓库的更新将不会应用。
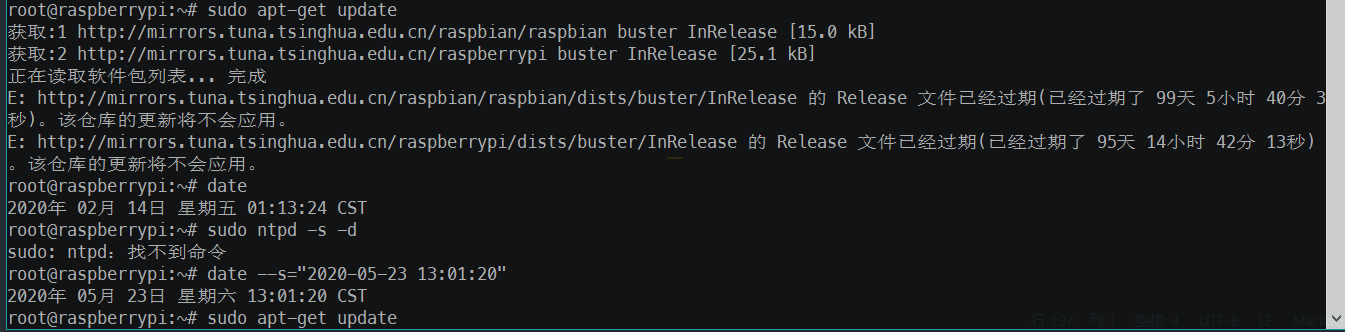
- 经多方排查后发现这是由于 树莓派时间不对 导致的,应该是安装后未校准时间导致的
- 校对时间有两种方式,但是 btpd未安装所以我们先通过
date粗略对准时间(见上图)ntpddate
date --s="2020-05-23 13:01:20"- 然后再
sudo apt-get update即可
通过电脑以太网口共享网络给树莓派
- 连接网线
- 电脑设置共享网络,共享接口设置为树莓派的接口
- 使用
arp -a或者直接查看IP,然后进行ping测试 - 一般来说都是可以直接通的
- 若出现已分配正确的IP,但访问不到的问题,尝试重置bug10的网络配置先。
树莓派通过以太网口共享 WiFi 给电脑
See: Wifi to Ethernet Bridge
https://github.com/arpitjindal97/raspbian-recipes/blob/master/wifi-to-eth-route.sh
- 安装组件:
sudo apt-get update && sudo apt-get upgrade -y && sudo apt-get install rpi-update dnsmasq -y sudo rpi-update - 连接WiFi (使用
raspi-config) - 树莓派以太网口设定固定IP,
vim /etc/dhcpcd.conf1
2
3
4interface eth0
static ip_address=192.168.1.1/24
static routers=192.168.1.0
static domain_name_servers=10.1.89.100 223.5.5.5 - 修改 dnsmasp 配置文件,
sudo mv /etc/dnsmasq.conf /etc/dnsmasq.conf.orig && sudo vim /etc/dnsmasq.conf1
2
3
4
5
6
7interface=eth0 # Use interface eth0
listen-address=172.24.1.1 # Explicitly specify the address to listen on
bind-interfaces # Bind to the interface to make sure we aren't sending things elsewhere
server=8.8.8.8 # Forward DNS requests to Google DNS
domain-needed # Don't forward short names
bogus-priv # Never forward addresses in the non-routed address spaces.
dhcp-range=172.24.1.50,172.24.1.150,12h # Assign IP addresses between 172.24.1.50 and 172.24.1.150 with a 12 hour lease time - 开启内核转发,
echo "net.ipv4.ip_forward=1" >> /etc/sysctl.conf && sysctl -p - 修改 iptables 规则:
sudo iptables -t nat -A POSTROUTING -o wlan0 -j MASQUERADE - 保存
iptables规则,sudo sh -c "iptables-save > /etc/iptables.ipv4.nat" - 修改
/etc/rc.local使其开机加载(或者其他方法)
使用
systemctl status dnsmasq ufw检查问题出错原因
树莓派接外置硬盘出错
[ 354.951916] EXT4-fs error (device sda2): ext4_find_entry:1455: inode #1436: comm gmain: reading directory lblock 0
- 原因:机械硬盘标称电流为0.8A, 树莓派3B+ USB口最大总输出电流为1.2A,机械硬盘起转电流要大于标称电流,而且上面还插了一个启动U盘。供电电流不够导致启动U盘电流不够,进而导致树莓派 down 机。
还是推荐上外供电(有源hub)